Practical models for technical communication - Shannon Kelley 2021
Instructions
Instructions and procedures
Users turn to instructions when they need to complete a specific task. This might be something as simple as operating a coffee machine or something as complex as disassembling an engine. Regardless of the level of complexity, instructions need certain elements to be effective. Technical communicators must consider elements of effective organization, language, design, and visuals as they create instructions. As with all technical documents, instructions should be written to solve a specific problem for specific users.
Solving Problems
Instructions are clearly designed to solve a problem. Consider when a user is likely to encounter your instructions. Users tend to consult instructions only when they can’t figure something out on their own or when something isn’t working as expected. Talk about a tough audience. Your user is likely to be frustrated or impatient. They don’t want to ask themselves, “Why am I doing this? Is this really the best approach?” Your job is to have already thought of those questions and to find the best answer.
Remember the situation and the needs of your user when you begin writing instructions. One of your challenges will be to remember that the audience hasn’t thought about the topic as much as you have, particularly if the instructions are about an area in which you have significant experience. You may need to think back to the first time you attempted the task you are writing about. What did you need to know to complete the task? If you haven’t completed the task, go try it and see what you learn. How would the activity be best explained? The ideal instruction set uses precise, brief language to save the user time and effort.
Don’t forget to consider a range of circumstances that could impact how the user might interact with your document. Here are some questions to help you decide how to approach your document:
” How will users receive your instructions—in print, online, by mail, in person, cell phone, tablet, or computer?
” What types of visuals will enhance communication for users—photos, screenshots, clipart, drawings, diagrams, tables, charts, graphics, videos?
Best Practices for Instructions
The following section introduces several methods for making your instructions clear and easy to follow. Best practices include logical organization, standard and consistent language, clarity and accuracy, scannable design, and the effective use of visuals.
Organization
Every set of instructions describes a series of specific actions that must occur in a particular order. For example, “Insert bolt #1 into hole A.” The user expects that following the instructions in the order presented will result in a successfully completed task.
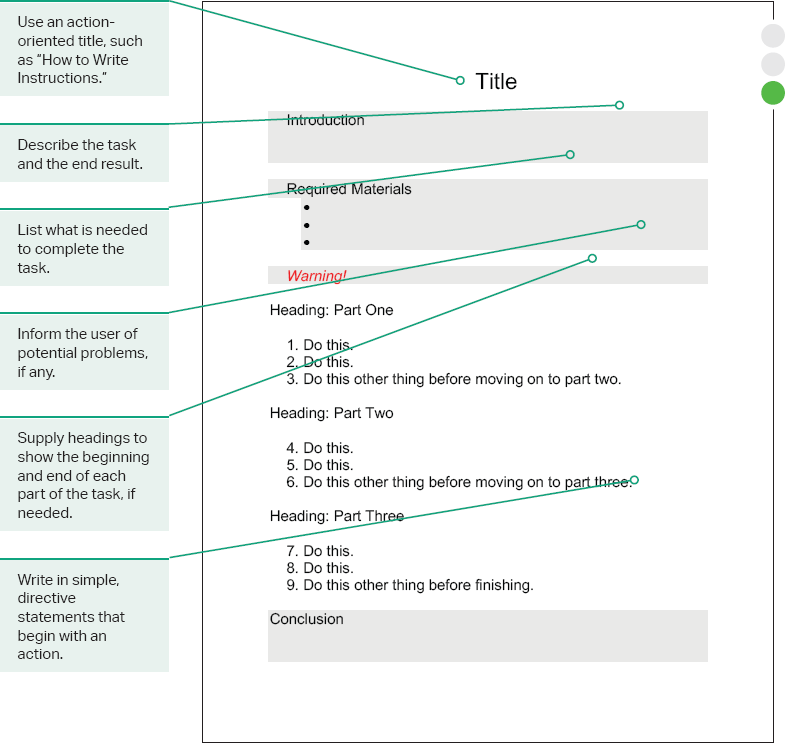
To assist in this goal, make sure your instructions follow a logical sequence. Like a story, most projects have a beginning, middle, and end. Decide where to begin, and then break each part of the task into distinct steps by using headings. Describe the steps in order using short, simple directions. One way to prepare to write instructions is to use a template such as the one provided here to organize your steps (figure 9.4). This document works like an outline that you can expand to fit the needs of any instruction set.
Figure 9.4. Instructions Template. This template can be adapted for many kinds of instructions.
Standard and Consistent Language
Easy-to-follow instructions are a sign that the technical communicator has paid attention to word choice. In particular, the word choice should be standard and consistent. This means that the language of the instructions matches what the user is familiar with and expects. For example, you should avoid technical jargon in instructions meant for a general audience. If a specialized term is needed for accuracy, define the term right away with words or an image to help the user understand.
See Chapter 8 for more on definitions.
Consistency of language means keeping the same level of word choice and style throughout the document. You can ensure consistency by paying special attention to verb tense, verb mood, and parallelism:
” Verb tense: Keep your verbs in present tense—describe things in the now. For example, “Assemble your unit on a carpeted floor” and not, “It will be a good idea to assemble your unit on a carpeted floor.”
” Verb mood: Use what is called the imperative mood—tell people what to do directly. For example, the sentences “Open the door,” “stop the car,” and “pass the salt” include verbs in the imperative mood that have an implied “you” as the subject.
” Parallelism: Keep words and phrases consistent. For example, “This installation requires a hammer, pliers, and a flathead screwdriver” and not, “This installation requires a hammer, pliers, and you’ll need a flathead screwdriver, too.”
Clarity and Accuracy
Along with using language that is standard and consistent, you need to keep your writing clear and accurate. Writing with clarity is about writing with purpose. Clarity also means that the content is easy to read and easy to understand. To accomplish this, describe what users need to do precisely and when they need to do it using language that is specific. As you’ll see in this chapter, pairing text with clear visuals can help, but the writing must first be understandable. For example, don’t just say, “Use a computer to go to our website.” Be clear and give the exact URL of the web page you want your user to visit.
See Chapter 1 for more on clarity and accuracy.
The accuracy of your language is also important. Usability testing, a process discussed later in this chapter, ensures that your word choice is accurate. If your user needs a screwdriver, for example, what size and type? If you’re describing how to complete a keyboard shortcut in a computer program, will it work on both Windows-based computers and Macs? Anticipate the user’s unique situation when analyzing your document for accuracy. Recognize that your experience with the task may not reflect the experience of the user.
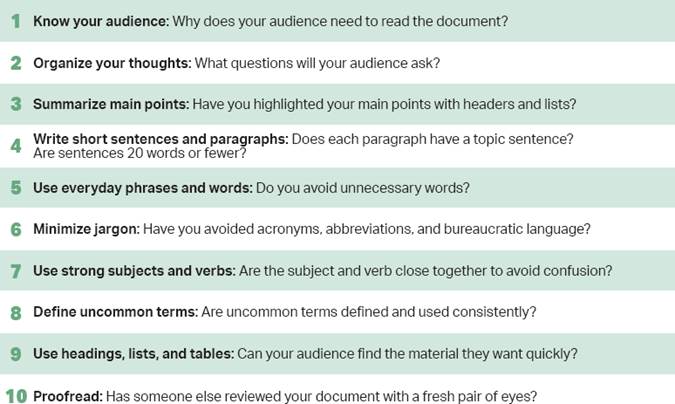
Using plain language is one way to make your instructions accessible to the largest possible audience. The federal government and many state agencies have adopted plain language policies that promote the use of clear communication. The Plain Writing Act of 2010 defines plain language as “writing that is clear, concise, and well-organized.” Clear writing is not only more understandable; it can also save time and money. It takes practice to write this way, however, as this document adapted from the U.S. Census Bureau shows (figure 9.5).
Figure 9.5. Plain Language Guidelines. Many government agencies are required to use plain language in their communications. These steps are useful for any kind of technical writing. Adapted from the U.S. Census Bureau.
Scannable Design
The last time you read instructions, did you read them from beginning to end like a chapter in a novel? Of course not. Reading instructions happens in small steps that accompany each stage of the task. Users move back and forth between the instructions and the actual task. For this reason, instructions need to be broken up into sections that can be located easily by scanning the document.
See Chapter 1 for more on scannability.
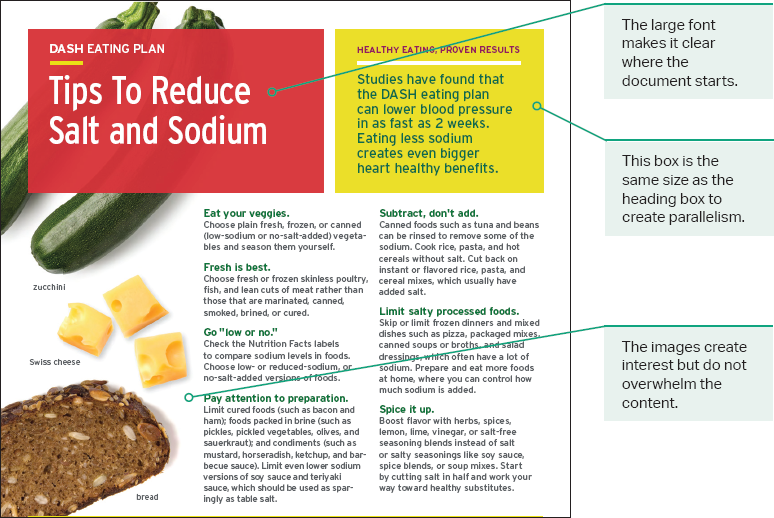
A scannable design is always important in technical communication, but this factor is particularly important when creating instructions. Notice how you can scan this flyer about the DASH Eating Plan to quickly identify its tips for reducing salt and sodium (figure 9.6). While this document does not include a set of instructions, it is an instructional document that uses similar techniques.
Figure 9.6. Enhanced Readability with Headings. Effective use of images and headings allows helpful information to fit this single page. Source: National Institutes of Health.
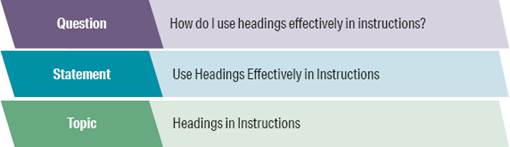
Headings are one way to make a document more scannable. Headings show the structure of the document and come in three general categories: question headings, statement headings, and topic headings. The more specific your headings are, the easier it is for users to scan for the information they need (figure 9.7). Question headings tend to be more conversational, while topic headings tend to be more formal. It’s up to you to decide which kind of heading is best for your audience and the purpose of your document.
Heading titles should be chosen carefully. Think about the keywords or phrases users will be looking for when they scan the document. Guide the user by providing similar words and phrases from one heading to the next, as in these headings for fence construction: “building your fence,” “installing your fence,” and “fixing your fence.” Keep the headings as short as possible while still being specific.
Figure 9.7. Options for Headings. This example includes three kinds of headings: question, statement, and topic. Notice how the level of formality changes slightly with each heading.
Headings are only useful when they are distinct from the rest of the document. That often means using a different style font, a different font size, or white space to draw attention to the heading. Here are some important design techniques to increase the scannability of your document:
” Use plenty of white space.
” Emphasize key ideas or warnings with color, icons, or all caps.
” Enlarge and make clear headlines with your headings.
” Use bold text for important terms.
” Format and structure the document consistently.
Structure and Format
Instructions are often structured vertically as numbered lists. While this is true for many instructions, there are variations. Some variations you might see include fixed-order steps, variable-order steps, alternate steps, and nested steps.
Fixed-order steps require that each step be performed in a sequential order. This technique uses numbered steps. For example, the fixed-order instructions for how to drive a car include the following steps:
1. Put the key in the ignition.
2. Turn the key until the engine starts.
3. Press the foot brake.
4. Put the gear shift into drive.
Variable-order steps are more flexible and can be performed in any order. This technique uses bullet points. Figure 9.6 is a good example of this structure. It doesn’t matter what order you complete the suggested steps—they are all meant to help lower sodium. You can reduce your sodium, eat your veggies, or add spice in any order.
Alternate steps include two or more ways of completing steps. In this format, you introduce the idea of alternate options in the introduction. You can use the word “or” to indicate the options within the steps. For example, “Snap the machine lid closed by pressing firmly or use the rubber mallet to close the machine lid.”
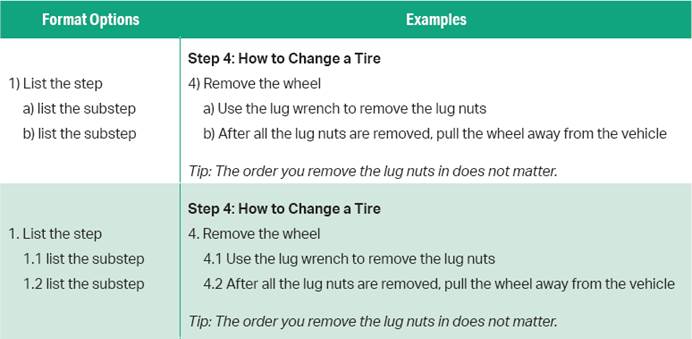
Nested steps are used when the steps are too complex and need to be broken down into substeps for clarification. You indent the substeps and order them as shown in figure 9.8.
Figure 9.8. Formats for Nested Instructions. The left-hand column shows the basic structure for nested step instructions with specific examples in the right-hand column.
Effective Use of Visuals
Visuals can improve a set of instructions and provide users with extra guidance for a complex process. Look back at figure 9.6 and notice how the visual elements help organize the information onto a single page. In effective technical documents, visual elements support the text, and the text reinforces the visuals. When using visuals, make sure the relationship between the text and image is clear. A visual should not distract from the content. Instead it should enhance the user’s understanding. Your user should be able to quickly glance at the visual and be able to understand what you want them to do.
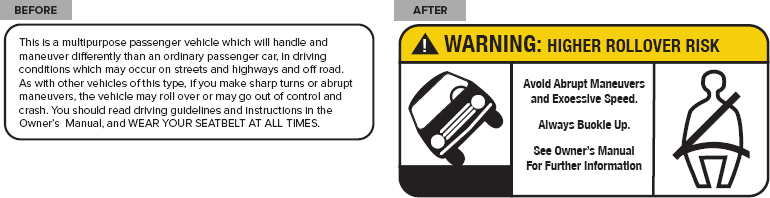
Visuals can also create concise documents. As the saying goes, a picture is worth a thousand words. Graphics, diagrams, illustrations, and charts can show plenty of information all at once and reduce the need for written description. You can see this principle at work in the before and after example from the National Highway Traffic Safety Administration (figure 9.9).
Figure 9.9. Enhanced Readability with Visuals. Images can communicate complex ideas quickly. Source: National Highway Traffic Safety Administration and Plainlanguage.gov.
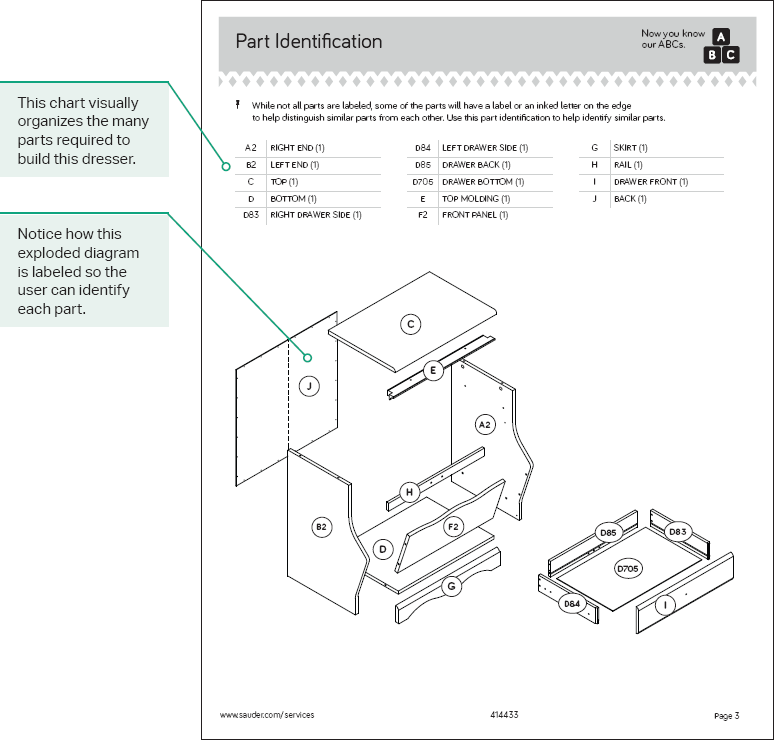
Another benefit of using visuals is recognition. Even if users aren’t familiar with a term (such as a specific tool or part), they might recognize a visual representation. Also, some tasks are so complex that trying to write the steps out (or read such a description) can be challenging. For example, look at the exploded diagram in figure 9.10. An exploded diagram is an illustration that allows the user to see all the parts and how they fit together.
Visuals show how the steps connect to each other and fit into a larger process. When thinking about how to use visuals in your instructions, consider the following questions:
” Which type of visual will work best for your instructions?
” Which color theme will you choose for your visuals?
” How much white space is needed to make them easier to read?
A consistent theme and style make your instructions uniform, as when you use similar formatting and color schemes for both tables and figures.
Many technical communicators borrow visuals rather than create them. This can save time, but make sure you follow your industry’s guidelines for acknowledging other’s work. Just because you find the perfect visual for your document online doesn’t mean you have the right to use it. If the owner of the image has given permission for its use, either in writing or with an open license, be sure to recognize the source either with a credit line beneath the image or at the end of your document.
See Chapter 2 for more on copyright and Creative Commons licenses.
Figure 9.10. Instructions with a Diagram. This page from an assembly manual uses several strategies for organizing information, including an exploded diagram that shows where all the parts will eventually go and a table of parts listed in alphabetical order. Courtesy of Sauder.